
This looks quite obvious and can be easily addressed by removing and reinserting the portable or removable storage media devices from the computer system. However, if it keeps happening by performing above steps multiple times as well as the same thing happens whenever you tried to connect the device on different computer, the solution might be tricky and needs you to follow some handful steps.
USB or flash drives are still a popular way to safely carry documents and other useful information. These devices generally have higher chances of becoming damaged, inaccessible or even unreadable by the computer system due to of lacking any inbuilt security mechanism. Therefore, you are strongly advised to carefully scan the targeted computer first before plugging your USB/ Flash chips based storage devices.
Once the device becomes inaccessible, you might lose your data permanently and use of best data recovery software can help you recover data from USB or Flash Drives. Recovery software are specially created to deal with various crucial data loss circumstances by providing relevant recovery methods to recover data from verity of storage media devices.
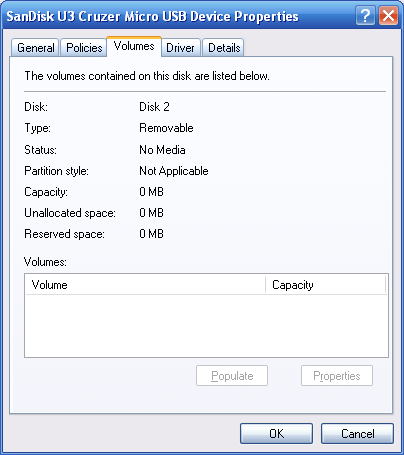
‘USB isn’t showing up on the computer’ is one of the most common problems that user may face anytime. The problem device may also not showed up under ‘Disk Management’, which usually contains all the crucial information about all the connected internal or external storage media devices such as file system type, used or total drive capacity, drive label etc. In some case, disk management may list the drive with such problems but show 0 Bytes as total drive capacity as well as consumed or free space.
Don’t get confused with various other forms of similar problems, such as:
Please insert a disk into drive X:
Whenever, you’ve decided to format drive with similar issues, you may have received the following error message on the screen:
There is no disk in drive X.
Insert a disk, and then try again.
For example, in the image below, you can see a drive with such problems that is showing 0 Bytes as drive capacity as well as unallocated or reserved space.
How to fix problem USB or Flash drive that didn’t showed up – Windows 7
Steps mentioned in this tutorial are simple, however it is advised you to be a computer proficient to carefully follow all the steps. Also, the risks are involved of losing data as some steps require you to completely format the problem storage devices (USB or Flash Drive).
Once you are done and ensured that all the stored data were accessible from somewhere else, you can proceed with troubleshooting steps below:
- Open the elevated command prompt by typing cmd in the search text bar, opened after clicking on start button in Windows 7. Right click on the Command Prompt from the search text bar and choose to run it as an administrator.
Please enter the admin credentials if it was previously set and hit enter. - Alternatively, you can also type diskpart.exe directly into the search text bar, opened after clicking on the start button in Windows 7. Again, you’ll need to select it to ‘Run as an administrator’ and provide required admin credentials.
- Once the black screen window opens, type ‘list disk’ and hit enter. This command will list all the internal or external storage media devices currently connected to your computer.
- You’ll need to locate the problem storage devices that stop showing in the computer previously. You can easily identify it by seeing the size of the problem drive. Note down the number of your problem storage device, located just below the Disk ### column.
- Type Select Disk X (Where X is the number of problem removable device) and hit enter. A confirmation message will appear that now the same numbered disk has been selected and any or all the actions you perform, will be applied to that particular disk.
- Perform clean command by typing Clean and hitting enter. This will erase all the stored data into the problem drive and make it very fresh exactly as you had used it for the first time. However, it’ll lose the defined file system type and needs to be assigned any one, either NTFS or FAT (Whichever you want)
- Type Create Partition Primary to assign a new file system/partition to that problem drive and hit enter. By default, Partition 1 will be assigned to that problem device.
- Type Select Partition 1 and hit enter to select the partition.
- Type format fs=ntfs label=USB quick in the command prompt and hit enter to format it once again and make it pretty fresh for new uses.
- Close the Diskpart or exit the black screen window by simply clicking on close button, located at the top right corner.
- Most probably, the drive will now be listed under ‘My Computer’ labeled with NTFS file format. From now on, you can use or access this drive without any problem. Moreover, follow the same procedure if the problem resurfaces in future.
Alternate options
If following the above tutorials didn’t help you, consider using the third party USB/Flash Drive formatting tool which will format the drive by using their own mechanism and repair the corrupt or damaged file system.
HP USB Disk Storage Format Tool is a great tool to format USB or flash media of almost any size and make it bootable if required. It’ll also lets you able to assign or give new file system type to your problem removable storage media.
Windows USB DVD creator is also a similar tool and can also be used to format or make bootable USB. In both ways, we’ll try to format and assign a new file system to the problem storage media as formatting any non-working or corrupt USB can do the trick and make it usable as before.
Last resort for making corrupt/damaged USB usable again
At last, if nothing works, consider following the link here and initiate the Launchpad. Follow on screen steps and U3 installer will restore the problem USB drive to its default/factory settings. Remember, this option will work only on SanDisk USB or Flash drive as the utility was specifically created for Manufacturer own modeled USB or flash drives.