Thursday, 31 May 2012

How to repair a corrupt PDF file in Mac

PDF means Portable Document Format, is a handy application to store important files & information. PDF file can store text, graphics and other information too. We can also make PDF files password protected & they provide a good level of encryption. If anyhow the PDF file gets corrupted then their exist possibilty of data loss.

Reasons of PDF file Corruption:

PDF files can be corrupted due to no. of reasons and avoiding these things will help in protecting our PDF files from getting damaged.
  •  Improper Download:
During download of PDF files we should not interrupt download otherwise the PDF files can get corrupt. Interrupted or incomplete download can lead to PDF corruption.
  • Problem during creation and uploading of PDF file:
PDF files also get corrupted due to not creating or uploading PDF files in a proper way. If the creator of PDF creates PDF incorrectly and if the uploader messed up during uploading so whenever we will download that PDF, it wont work.
  • Corruption due to HTML tag:
HTML tag corruption occurs whenever we try to view our PDF file in Word or any other text editor.
So when we view our PDF file in anyother editor then some tags automatically gets changed and this leads to corruption in PDF file.
  • Corruption due to virus:
PDF files can also get corrupted due to virus attack. Sometimes virus modify the PDF files and so information needed to load PDF becomes corrupted and so we can't view file properly.

How to repair PDF files:

There are many PDF repair tools available in market to repair corrruted PDF file. But before choosing we should check all the features of the software. In my opinion I personally recommend Stellar PDF Repair software. This software is very effective in repairing the corrupted PDF file and it is very easy to use too. You can download this product from www.stellarinfo.com.

Some screenshots of Stellar PDF Repair are:


Step 1)This is the main interface of Stellar PDF Repair for Mac. Click on "Repair PDF Files" and select the corrupted and damaged PDF files.


Step 2) In this screenshot, you can see  "Look in"  so click on "Select File" to select PDF file from a known location and by clicking on "Find Files" you can select PDF from the local drives.


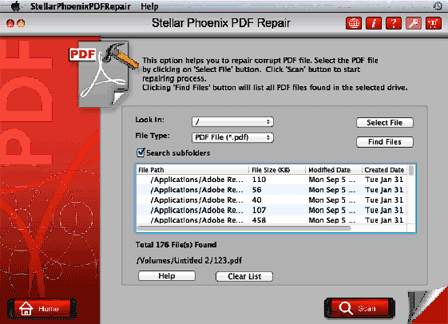
Step 3) This step will show all all the PDF files in the drive that you have selected and then you can select the PDF files from the list and click scan.


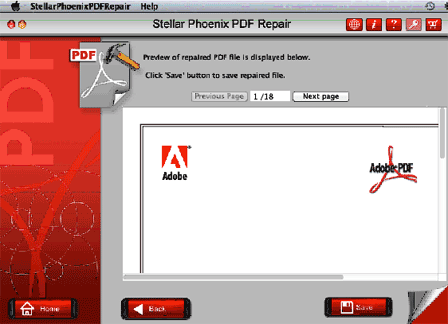
Step 4) After the scanning is done, the software will show you the preview of all the files repaired and just click on "Save" button to save all the repaired files.

If you too have any problem related to PDF then Stellar's PDF repair software is a great medicine to heal your corrupted PDF file. Stellar PDF repair software recovers files in exact formatting as it was in the original document. The PDF repair for Mac has many pros and few cons like the software does'nt repair PDF files which are password protected. Otherwise, it's a tool that will surely prove its significance.

Tuesday, 29 May 2012

Why Online Storage is a promising backup service these days?

If you are worrying about your important data and want to keep it safe from getting deleted or stolen from your Mac then Online Storage is the best technique to store, manage your data.
Online storage is basically storing your data to a remote online place. With Online storage you can save, access your data securely and safely. You can protect the data from hard disk failure, viruses, file corruption, accidental deletion and even theft. With Online Storage you can share data online with others and can provide extra protection to your confidential data by encrypting it.

You might about doubt storing the data because others can easily access it. But to make your doubt vanish I must tell you that during data uploading and downloading, the network is protected by a protection layer known as Secure Socket Layer (SSL). For Instance: you must have accessed your saving bank account online!! There you can see that its URL starts with “https//” rather than http://, which indicate that the connection between your web-browser and server is secured by a secure socket layer. So you need not to worry about the security of your data in online storage.

Online storage firms provides facility to encrypt your data before uploading it to remote backup.
So you are the only one who knows the password for encryption and only you can access data.

Some good online storage firms are:
  •     www.justcloud.com/
  •     www.zipcloud.com/
  •     www.binfire.com/
  •     www.idrive.com
  •     www.snapdrive.net
Tips to choose your Online Storage firm:
  • Security:
Firstly, you must check the security level that the online firm is providing. Firm should at least provide 128 -bit SSL. If a company is not telling about its security details then you should avoid that firm.
  • Compatibility:
Some online firms suggest you to download softwares to use their storage services. So you must check first whether the software to use online storage service is compatible with your system or not.
  • Storage space:
You should select the unlimited data store plan. But if you are sure that you need a little space then you can go for it too.
  • Automatic daily Backup:
You must check that whether the company is providing daily backup service or not. Automatic Back up service will ease your burden and will protect your data automatically.

Some Disadvantages of Online Storage :
  • Hacking:
Your data is online so a hacker can hack all your confidential data and can access and use it for unauthorized purpose.
  • Internet Speed:
For quick access to your data you need to have good internet speed otherwise fetching of data from the server will take time if you have slow internet connection.
  • Cost:
As online Storage is a new trend so it is bit costly and to get online space you need to spend a good amount of money. So if you are not in the mood to spend much on storage then online storage is not your cup of tea.

Online Storage have begun revolutionising the data backup trends & techniques. However, if you still doubt storing your personal data online then you can go for the traditional way of taking backups like cloning and imaging. You can take backup on your external Hard Disk Drive and can use it as a ready to use copy.


Sunday, 27 May 2012

Things to remember when switching from Windows to Mac...

Moving to a new OS is a tough and challenging task to complete. But with the same time you will enjoy this too. Remember the last time you moved or shifted your home from one place to a new place. For that you must have packed all your things and stuff and then move on to a new place with great enthusiasm.  Similarly, you have to do while switching your OS. You need to transfer all your files and data, moving your hardware’s and software etc.

For transferring all your files and data:
There are many ways to transfer the data from Windows to Mac. Best way to transfer your data is with the use of External Hard Disk. Firstly connect external HDD to your Windows and transfer all your files to the drive and then disconnect it from Windows.
After that connect your external HDD to Mac and then transfer all files in Mac drive.
For data-transfer purposes, make sure the drive is formatted using Windows FAT32 file system, so both your Windows and your Mac can read and write on it. After you have completed the file transferring process, use OS X Disk Utility to reformat the drive as HFS+.
You can also use online storage facility like the icloud, dropbox etc to manage your data.

Moving your hardware and software:
Most of the hardware devices that you used with Windows like printers, cameras, networking devices, pen drives, scanners etc. will work fine with Mac too. If you have attached the hardware device but its not showing in Mac then you can go to the manufacturer's site and download the suitable driver.
But software application of both Windows and Macs will run only on their platforms. But you can get the software with the same functionality in both windows and Mac.
All leading web browsers that can be found on Mac are opera, Firefox, chrome. But you can’t have Internet Explorer in Mac.

GUI Comparison:
GUI of Windows and Mac are very similar.  You would not find much problem on working with Mac when switching from Windows. You can find Dock in the bottom of screen in Mac. Dock has all the major applications like disk utility, finder etc. Dock also shows the running applications.
On the top you can find the application specific menu i.e. whenever you open an application, then its own menu toolbar will be shown on the top of screen.
  • To resize a window in Mac hit the right corner, instead of grabbing the sides like you do in Windows.
  • Finder in Mac is similar to File manager in Windows.
  • A system preference in Mac is similar to Control panel in Windows.
Disk Utility:
  • Mac has a Disk Utility feature. Disk Utility is a multipurpose program for working with hard disks, CDs, DVDs. With this feature you can erase, format, and partition hard disks and rewritable CDs and DVDs.
  • In this feature, you can run First Aid, a function that repairs file systems and file permissions.
  • You can mount, create, and modify disk images, as well as write or burn them to disks, CDs, and DVDs.
Some important keyboard shortcuts for Mac:
  • To force quit a hang application: command key+ Alt + Esc
  • switching open windows: command+ tab
  • close current window: command key+ w
  • print screen: command key+ shift +3
So I think this article will help Mac switchers to work with Mac without much difficulty. But you can master a Mac after you have worked on it for sometime.

Wednesday, 23 May 2012

How modifying and adding a new Mac partition is easy with partition manager tool?

Do you have a single partition on your Mac hard disk drive and want to delete or add new partition by collecting the free space in all the drives. Then you must be in search for a right software to do this job. Recently, when I decided to delete and add a new partition to my Mac I found a utility that works like magic.

I have a Mac mini 500 GB HDD. I partitioned my Mac hard disk drive into four partitions, one for operating system, another one for my important files, one for my personal data and fourth partition for random stuff. The reason behind making different partition on HDD was to make the partition intact which holds the OS and other system files separating my personal data from them. However, the fourth partition of my hard disk is somewhat useless to me so I decided to use this drive space for storing my other important files & folders. And to do that, I was in need a utility that can delete the unwanted partition and creating a new one without causing the data loss. After a careful research on the available partition software for Macs, I decided to choose Stellar Partition Manager. And after using this utility I was overwhelmed with my decision to go with Stellar Partition Manager. Being a complete do-it-yourself software, I had no issues in creating and deleting the partitions. I am sharing the steps that helped me achieve my objective through this tool.

Deleting my Mac partition:
This feature of software deletes an unwanted partition or completely formats a partition and assigns free space for the new data.

Steps to be followed for deleting a partition:
1: Launch Stellar Partition Manager and then select the hard disk.
2: Select the volume in the middle pane.
3: Click on delete button on the toolbar.
4: Then task for deletion will be added in the Task to do list and then click on start to start the listed task.
5: A message box with warning is displayed. Click Continue to delete.

Note: Although my partition was not containing any important data so I deleted it with the tool. However, if your partition holds some urgent files and folders then make sure to create a back before choosing it to delete.

Create a new partition:
With this software I created a new partition on hard drive. The software interface was very much friendly.

For creating a new partition I followed these steps:
1: Start Stellar Partition Manager. Then select the hard disk.
2: After that I clicked on Add Button on the toolbar and Add new volume dialogue box is displayed.
3: Then gave volume name and then use the slider to fix the size of partition.
4: Then the newly added partition was displayed in the task to do list and then click on start button to start the listed tasks.
5: A message box with warning is displayed. Click Continue

Working with the Stellar Partition Manager for the very first time was a great experience for me. You just need to drag the partition to adjust its size and the job is done. I strongly recommend this software because even a novice can use it without difficulty.

Tuesday, 22 May 2012

Do u want to recover videos, Photos from a severely scratched CD or DVD?????!!!!


Have  lost your favourite movie and photos from CD or DVD?? If so, then I would suggest you need not worry. Because you can still recover all your videos , movies , photos even from a badly scratched CD, DVD or BD. Recently, faced a similar situation until got to know about how recovery of all our files is possible from a severely scratched CD or DVD.

I am a big music freak and have a huge collection of music videos in my DVD's collection. I am fond of buying almost every DVD of my favourite singer and musicians. Whenever get time from my work I play the DVDs on my Mac Mini system. This really chills me out!! But I have a very bad habit of not keeping my CD-DVDs in a proper manner so that they remain safe from temperature, humidity and from getting scratched. So sometimes, actually most of the time whenever play a DVD, after listening to it I just throw it carelessly in my room rather than putting them in a proper DVD case. Due to this many of my exclusive DVDs got scratched and they became useless, inaccessible resulting in loss of my favourite videos songs. Last time when I inserted the DVD in my Mac Mini, surprisingly it didn't showed up. I checked the DVD and found some scratches on it. And tried cleaning it with the solution but all my efforts ended useless. My Mac was still unable to read it. This made me conclude that I have lost my music videos from the DVD. 

But suddenly a  thought strikes my mind of searching Google to find some answer to my problem. I begin my search on internet asking for 'how to recover data from a scratched DVD'. And then,found an article on the same which was posted on a data recovery company website called Stellar. I read the article and quickly found my solution. They suggested to download the tool and run it on the Mac. I quickly installed the free demo version of the CD DVD recovery software and follow the guidelines. 

Bingo!! It really worked for me!! and was amazed and equally happy to find out that my inaccessible video songs were listed in the interface of the Mac data recovery software. Now I needed to purchase the software so that data can be recovered and save it on my Mac Mini hard drive. I made the payment and within 24 hours and received the serial key in my mailbox. I was just a step closer to recover back my songs. I took a deep breath and inserted the serial key and followed the same step-by-step instructions which resulted in recovery of my valuable video song collections. I am happy not only because of the data recovered  but with the overall simple and interactive features of a data recovery Mac software. 

The above scenario opened my eyes and now I feel much educated about all this data loss and recovery software.